Introduction
As well as sending outbound SMS messages, you can also conduct 2-way conversations with clients/customers using the SMS system. Receiving messages requires you use a number/system that permits inbound SMS messages. When these are received into the system, they are separated into Inboxes, so replies can be sorted through and replied to if necessary.
Overview
By default, you are provided with a random keyword on a short number. This allows people to contact you by texting a message, prefixed by the keyword to the short number provided. The system will remove the keyword from the message when it is received into the system, and place the message within this inbox.
The easiest way to initiate a 2-way conversation is to use the SRS (Simple Reply service). This feature allocates a randomly assigned pooled mobile number to your account, which is then used to send SMS from. Customers can, if they wish, reply to this message, which is then received into an Inbox labeled "Simple Reply Service". To use it, simply select the "Simple Reply Service" radial button within the sending template in the portal (see below).
The SRS service is open to be used by any customer and requires no additional purchases. However, Using the SRS service to send messages costs 1.5 SMS credits per message, rather than the standard 1.
However, in all cases, it costs nothing to receive SMS messages from customers.

You can also create additional inboxes, in certain circumstances.
- If you have a dedicated inbound number (DIN), you can create as many keywords on this as you like.
- The only exception to this is the SRS number. You cannot create keywords on this number.
- You can create additional sub-keywords to existing keywords, which are separated into their own inbox.
- You can also purchase additional keywords on a shortcode if you wish. In this case, you can choose the shortcode you are allocated.
Access and Use
To access your inboxes, click on Receive -> View Inboxes
When a reply is received into the system, it is placed into the relevant inbox. You can view the messages by expanding the inbox and clicking "View Messages"

When you are in your inbox, it will look like this...
You can view and reply to individual messages when they appear on the list. These are separated by contact number. You can also use this screen to adjust contact lists, by using the options below the message list. You can also export all the messages you have received, search the messages and set up an RSS feed from the inbox.
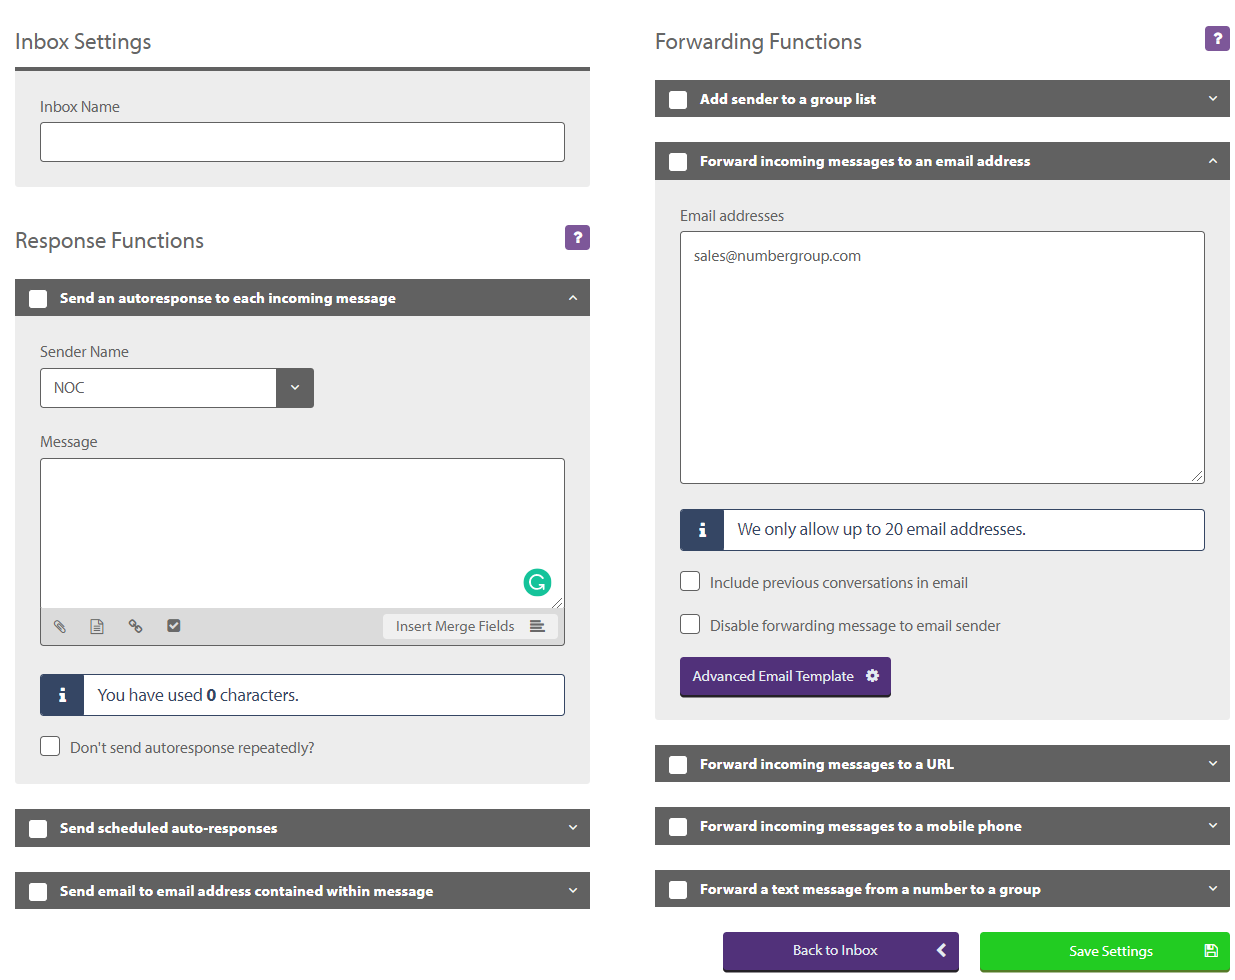
You can adjust the settings for each Inbox by selecting the "Settings" button. This will take you to a screen that looks like below...

On this screen, you can adjust settings for the Inbox in question. Running from the top, you can give the Inbox a name, and directly below this, there are the response functions. These allow you to add various automated actions relating to responses which are performed automatically, or on a scheduled basis. These are listed below...
- Send an autoresponse to each incoming message - This will send a pre-defined message to each contact who messages the inbox in question. You can use all the standard mark-up language that can be used for sending messages. You can also specify if you send the auto response repeatedly.
- Send Scheduled Auto-Responses - This allows you to create an Auto-response template which is sent at a scheduled time.
- Send e-mail to e-mail address contained within the message - This can be used to send a predefined e-mail message to an e-mail address contained within the SMS message. The system will parse any correctly formatted email address from the inbound SMS message and then send an auto-response to this e-mail address. You can specify the senders' name, e-mail address, subject and message contents.
On the right-hand side of the inbox settings page are the Forwarding functions. As the name suggests, this is used to forward the SMS message elsewhere. There are 5 options available...
- Add Sender to a group list - This allows you to add the sender of messages to a pre-defined group list. You can also add aspects of the inbound SMS to certain contact fields as well if you should wish to do so.
- Forward incoming messages to an email address - Allows you to forward any received SMS to 1 or more predefined email addresses (up to a max of 20). You can also adjust the email template that is used by clicking on the "Advanced Email Template" option.
- Forward Incoming messages to a URL - Allows you to forward the message to a predefined URL and port.
- Forward incoming messages to a mobile phone - This allows you to forward the SMS to another mobile number. You can also, in this case, adjust the template used in the forwarded message by clicking on the "Advanced Forward Template". Please note, you will be charged SMS credits for the forwarded message, the number of credits depending on the length of the forwarded message and destination number.
- Forward a text message from a number to a group - This allows you to send predefined messages to a group of contacts if an inbound SMS is received from a particular number. You can adjust the template used by clicking on the "Advanced Group Forward Template".
Please ensure that after any changes are made, you click the "Save Settings" button to ensure the changes are saved.
